Metoc Instructions
Measurement is a two step process.- Calibration This should take less than 5 minutes, and only needs to be done once after installing Metoc.
- Measurement Print out a special pattern on paper (a 'fiducial pattern'). We supply you with a pdf file of this pattern. Place this paper on the floor to measure something in the room, the pattern must be visble in the photo.
For Calibration you need:
- An iPhone or iPad with the Metoc app installed
- A different device (desktop computer with flat LCD monitor, TV screen or large tablet) with an internet connection to display the calibration pattern
For Measurement:
- An iPhone or iPad with the Metoc app installed
- A printed copy of your fiducial pattern
Calibration Instructions
- Use your iPhone to take seven photos of the calibration pattern. The Calibration Pattern is available at metoc.xyz/calib
- Type this URL (metoc.xyz/calib ) into another device (not your iphone running the app) with a flat screen like a LCD computer monitor, TV or large tablet. Do not view it on a curved screen. A curved screen will result in inaccurate calibration and useless measurements. Make your browser full screen mode. (On Windows press F11. On OSX Chrome and Safari press Ctrl+Command+F).
Metoc will guide you through the seven types of calibration pictures you need to take using your iPhone. Use adequate lighting and hold the camera still. Let the pattern fill as much of the frame as possible. Take the pictures in landscape mode. The image below an example of taking a picture from the right of the calibration screen
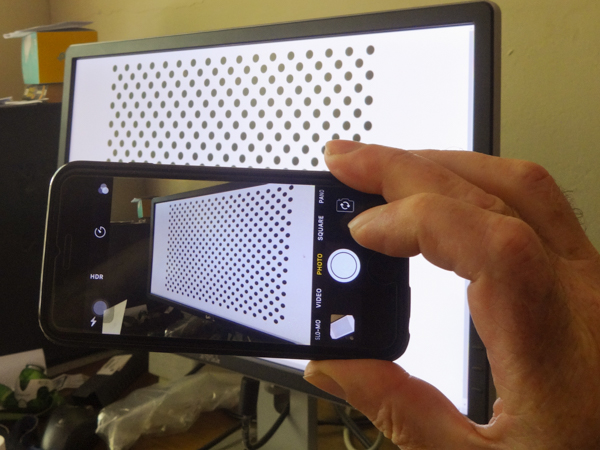
-
Run the calibration procedure in Metoc.
- This consists of taking at least seven calibration pictures. Click on the 'Calibration' button on the Metoc start page
- The next screen will guide you through the calibration pictures needed. You need one from the left, right, above, below, directly in front of the pattern, and with the camera rotated clockwise and counter clockwise (about 30 degrees) from portait mode.
- After you have taken or selected a picture, Metoc will check that it can find the dots of the pattern, and that the picture is from the correct angle If it is successful, it will move on and prompt you for the next picture, till you have all seven.
- After you have taken your seven pictures, The 'Do Calibration' button will be visible. Press it.
- Metoc will respond with an overall error figure for the calibration. The lower the error, the better. Error figures below 0.1 are fine. If the error is too large, Metoc will not accept the calibration and you will need to take some more pictures. You can delete calibration pictures by clicking on the 'View Pics' button on the top right of the calibration screen. You will see a list of all the calibration pictures so far. You can take extra ones by clicking on the camera icon, or delete pictures by swiping them to the left then clicking the red delete button
Measurement Instructions
- Print out your special fiducial pattern onto a sheet of paper. You can use letter size paper (USA) or A4 size elsewhere. The fiducial pattern is available as a PDF for download from here
Download this pattern and use Adobe reader to print it.
- Don't print it directly from your browser or else you might get a distorted or mis-sized pattern which will mess up your measurements.
- In Adobe reader under printer options, be careful to select [Actual Size], Not [Fit].
- After you have printed the pattern, check the dimensions shown in light grey with a ruler. Horizontally the distance between the two outermost dots should be 9.5 inches or 241.3 mm. Vertically the distance between the rows of dots should be 5.7 inches or 144.8 mm. These dimensions are shown in light gray on the PDF pattern. If these distances are not exactly correct then your measurements will be inaccurate.
- Start measuring using your device's camera. Take a picture of what you want to measure, with the fiducial paper lying on the floor, as shown in the following image.
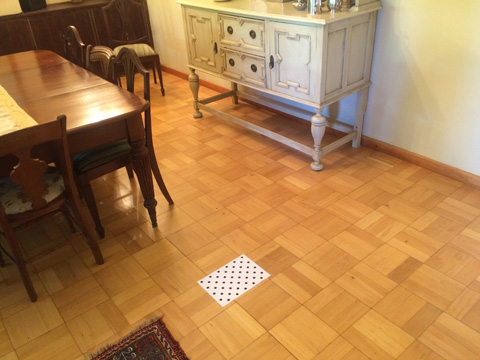
For highest accuracy, keep the pattern near the center of the picture and as near as possible to the item to be measured. This version of Metoc can measure any distance along the floor (in the same plane as the pattern), and any height of an object above the floor.
-
Click on Start Measuring from the start page of the Metoc app, then select a picture to measure.
Tip: Place all your measurement pictures into an album, then it will be easier to navigate to them
-
To Measure a distance along the floor: zoom your picture to near where your first measurement point is. Tap the picture, and a cross hair will appear. Drag your measurement point till it is under the cross hair then tap again.
Tip: If you are entering a point near the edge of the screen and cannot get it onto the cross hair, you might need to zoom a bit moreRepeat for the second point. The distance will be shown at the bottom of the picture. The default units are inches.Tip: To change the units, click the top right menu, this will give you an option to change the units to cm.Tip: You can also snap to existing points if you tap on them
- To measure a vertical distance, Enter the first and second points as before. The initial measurement given by Metoc will be wrong, as it thinks that both points are on the floor. (Its not smart enough to figure that part out yet?) So now you have to tell it that one point is on the floor, and one in the air. E.g. One point is the foot of a table, and the other is the top of the table. Double tap on the top point. A menu screen will pop up. One of the options will be something like 'Make point D above point C'. (All the points that you enter are labelled, A,B, C.. etc). Select that option. The point that is in the air will change color, and it will snap to the vertical line above the ground point. The distance will also be updated to be the correct vertical distance.
- Editing Points: To edit a point or measurement, double click on it. You nead to be farly close to a point to select it for editing, you might need to zoom in. A menu will pop up giving you the option the delete points, delete a measurement, move a point, or make a point vertical (in the air) or return it to the ground. You cannot move points in the air. To move them, double click, return them to the ground then move them, then return them to the air.
-
Click on Start Measuring from the start page of the Metoc app, then select a picture to measure.